

Planning one shoot for horizontal video, vertical edits and photography
Plan the outputs before the camera arrives. A practical guide to coordinating corporate video, vertical edits, interviews and photography in one production brief.

- List the finished assets and their purposes before planning the shoot.
- Check composition and storytelling for each format, rather than relying on cropping.
- Give photography, sound, captions and final exports their own production checks.
Plan the finished assets before the shoot
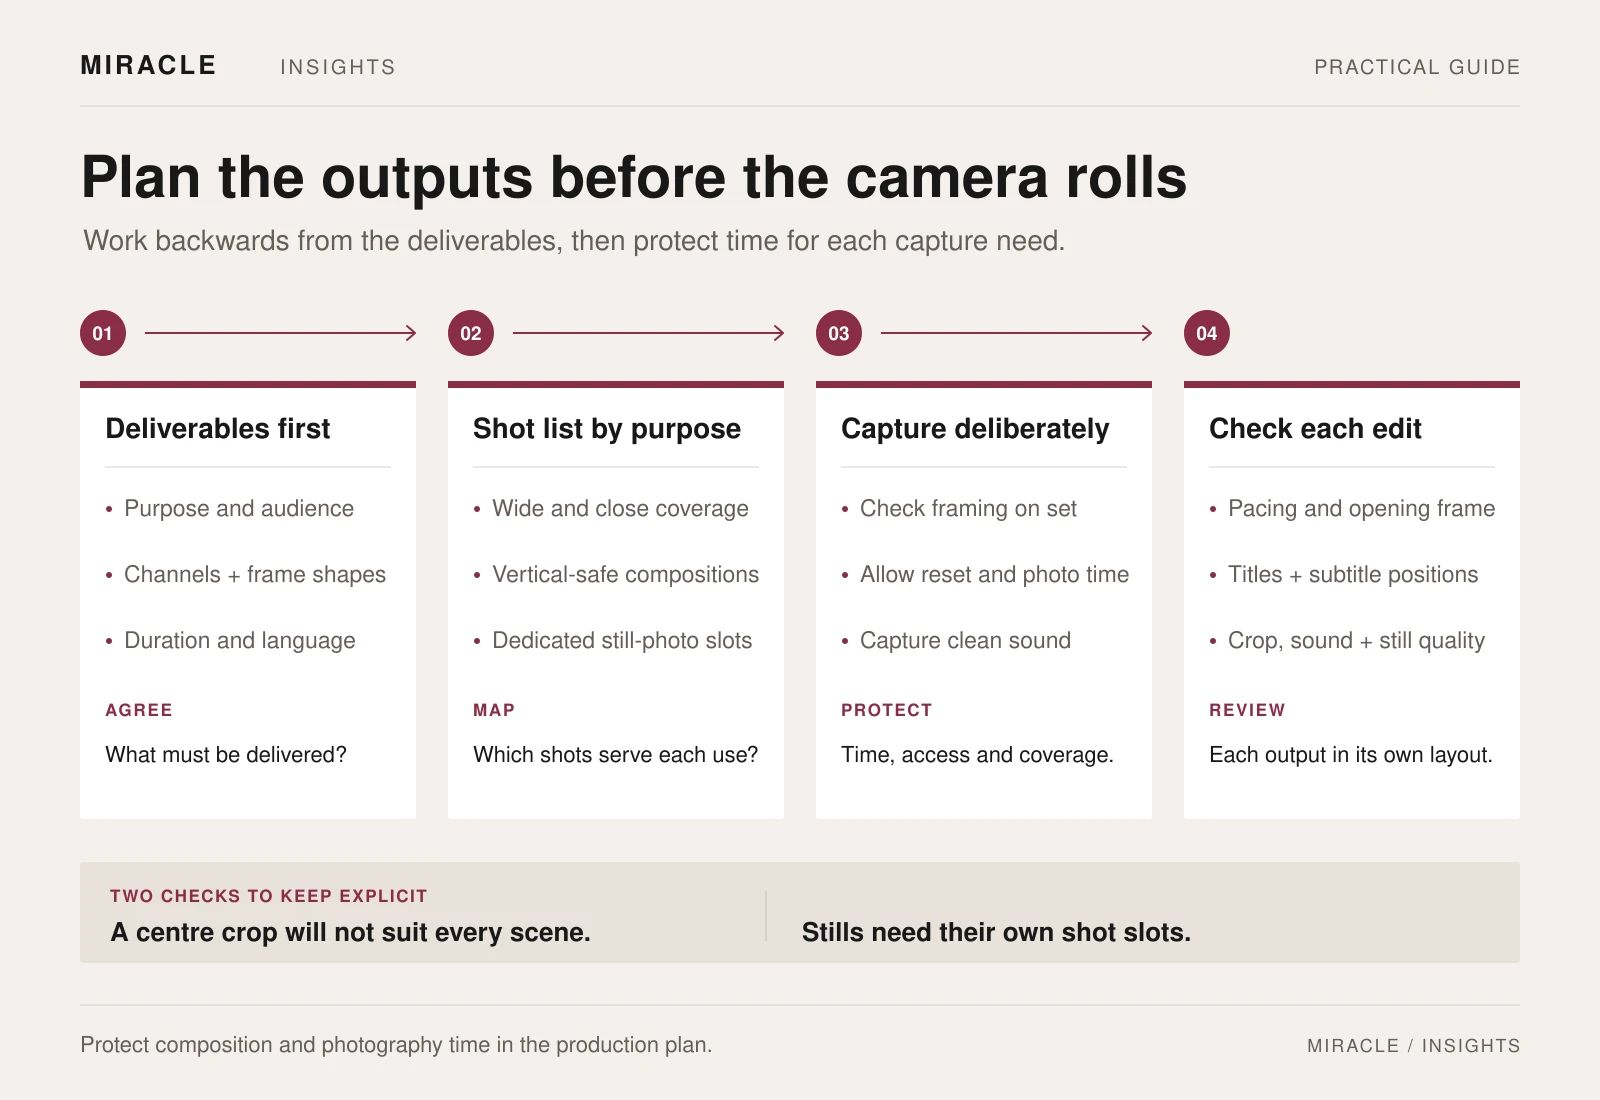
Plan horizontal video, vertical edits and photography as separate deliverables, even when they share people and locations. Each needs suitable framing, coverage and time in the schedule.
For each asset, write down its message, destination and approver. The producer can then decide which shots can be shared and which need a separate take or setup.
The useful question is what the crew must capture for each output. Agree priorities before promising how many assets can fit into the available shoot time.
1. Create a deliverable map
For each planned asset, record its audience, message, destination, approximate length where relevant, frame shape, language and next step.
An illustrative set might include a company introduction for the website, a short product demonstration for a social channel and selected portraits for a presentation. Each has a different job. Decide which are essential and which are optional if production time is constrained.
Confirm the current destination requirements with the publishing team. A horizontal 16:9 video and a vertical 9:16 video are useful planning examples, but each placement needs its own specification. YouTube, for example, explains how its player adapts to different video resolutions and aspect ratios.
Keep that specification alongside the deliverable map rather than depending on a general label such as “social version”.
2. Turn messages into a shot list
Work backwards from what each edit must show. If a short clip explains a product feature, identify the visible action that demonstrates it. If a film introduces a team, decide whose contribution needs to be heard and what supporting pictures help explain their work.
A useful shot-list entry includes:
- The subject or action and why it is needed
- Which deliverables it supports
- Required orientation and framing
- Spoken content or sound to capture
- People, products, locations and access needed
- Priority and any dependency
This helps the crew see the purpose of a shot and gives the client a practical way to check coverage. It also reveals when one attractive scene cannot supply everything the proposed edits require.
3. Plan horizontal and vertical compositions
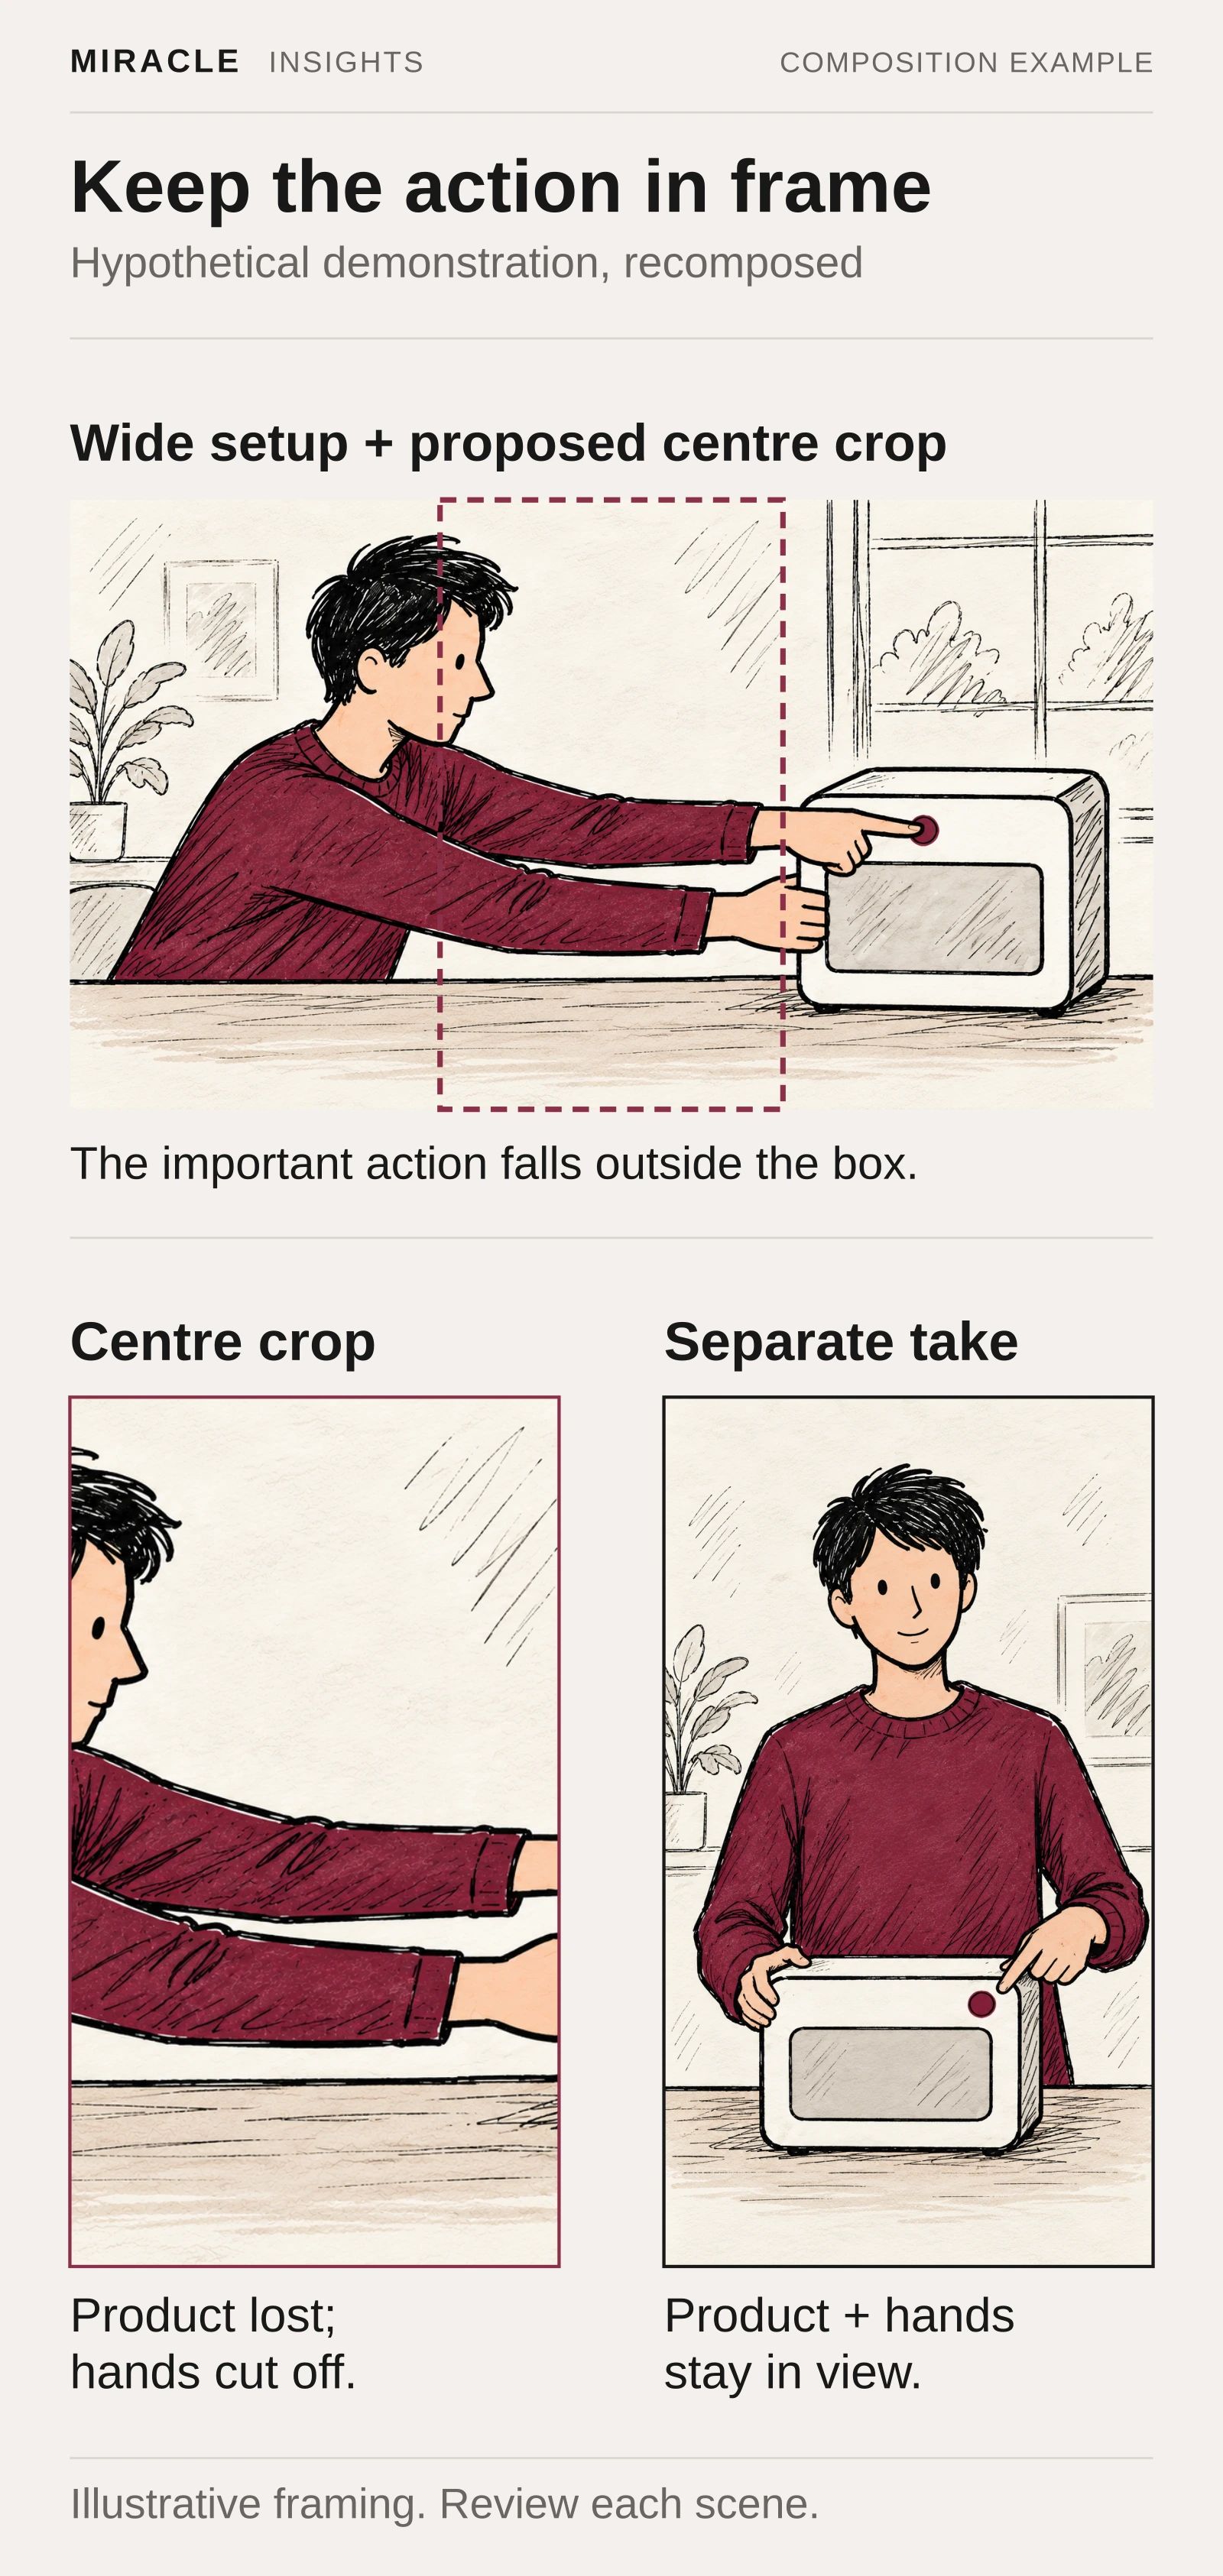
Review key scenes in both shapes before filming. A horizontal conversation between two people may need a different setup for a vertical edit. A demonstration may lose its important detail if a narrow crop removes the product or the operator's hands.
Depending on the scene, the solution might be an alternative framing, a dedicated vertical take, a close-up or a different visual sequence. Leave room for titles and captions according to the intended layout.
Automatic reframing can help in post-production, but it still needs review. Adobe's Auto Reframe guidance notes that complex sequences or rapid movement may need keyframe adjustments.
Ask to preview representative frames or short tests. Approving the subject's position, text space and visible action early is more useful than discovering the problem after the location is no longer available.
4. Record interviews for the intended edits
Prepare questions around the messages in the deliverable map. If an answer may appear in a short standalone piece, ask the speaker to include enough context for it to make sense without the interviewer's question.
Allow time to confirm names, titles and pronunciations. Plan where the interview will happen and check the sound environment before committing to that location.
Capture supporting material linked to the answers: the process being described, the product in use or the relevant working environment. Mark which points are still unsupported by pictures so the producer can address them during the shoot.
A shortened edit needs its own coherent beginning and ending. Identify that story during planning rather than assuming it will be found by trimming a longer film.
5. Give photography its own place in the schedule
If the team needs portraits, product images or website photographs, list them as specific deliverables. Confirm the intended crops, background, subject arrangement and whether space is needed for accompanying copy.
Allocate time for those photographs. Decide who is responsible for them and how they fit around video recording, location access and the subjects' availability.
Video frame grabs can also be an agreed output. Adobe documents how to export a still frame, but the ability to export one does not establish that it suits a particular design. Review the selected frame at its intended size and crop. Do not assume dedicated photography is included unless it is in the scope.
6. Check access and usable material before the day
Confirm the people, products, spaces and brand assets needed for each priority shot. Ask the responsible owners what may be filmed and released. Remove confidential material from backgrounds and screens before recording.
Prepare a realistic running order that includes setup changes, interviews, demonstrations, still photography and review points. Identify what can move if a speaker or location becomes unavailable.
Use a short readiness check with the production team: required material present, access confirmed, subjects briefed, approved messages available and unresolved decisions assigned. The objective is to make the agreed priorities achievable within the available production conditions.
7. Review the outputs separately
After filming, check each deliverable against its purpose. A horizontal master approval should not automatically approve the vertical edit, its text placement or its ending.
Review captions, on-screen labels and sound. W3C's media-planning guidance explains why access features should be included in the production requirements. Test the agreed versions in their intended publishing or playback environment.
At handover, ask for a register identifying each final file, version, language and destination. Confirm which source material, working files and future-editing arrangements are included in the agreement.
Miracle's brand-content, video production and photography services can be scoped around this shared deliverable map.
What to include in the production brief
Include the assets you need, intended channels, available people and locations. Set out the priorities for coverage and delivery.
Frequently asked questions
Can we create every vertical edit from horizontal footage?
Assess the scenes first. Some compositions can be reframed effectively; others need separate coverage. Important subjects, movement or graphics may fall outside the intended crop.
Does one shoot mean one filming day?
No. It means a coordinated production plan here. The required access, locations, setups, people and outputs determine the schedule. Confirm the actual filming time in the proposal.
How many social clips should we request?
Start with distinct messages and intended uses. Request the pieces your team can use meaningfully, then have the producer assess the coverage and editing needed. Avoid choosing a quantity without a content plan.
Can we add photographs during filming?
Discuss them before the shoot. Dedicated stills may need their own setup, time and person responsible. If frame grabs are sufficient for a particular use, list them separately and agree how they will be reviewed.
Planning something similar?
Talk to Miracle